Transcript: This video roughly follows the written instructions available on this page, however you may view the video's full transcript here. Captions are also available in the YouTube video player.
- How to Navigate the Arts Impact Explorer
- How to Build A Fact Sheet
- How to Add a Project to the Local Projects Database
- How to Edit an Existing Project in the Local Projects Database
- How to Add a Publication to the National Arts Publications Database
How to Navigate the Arts Impact Explorer
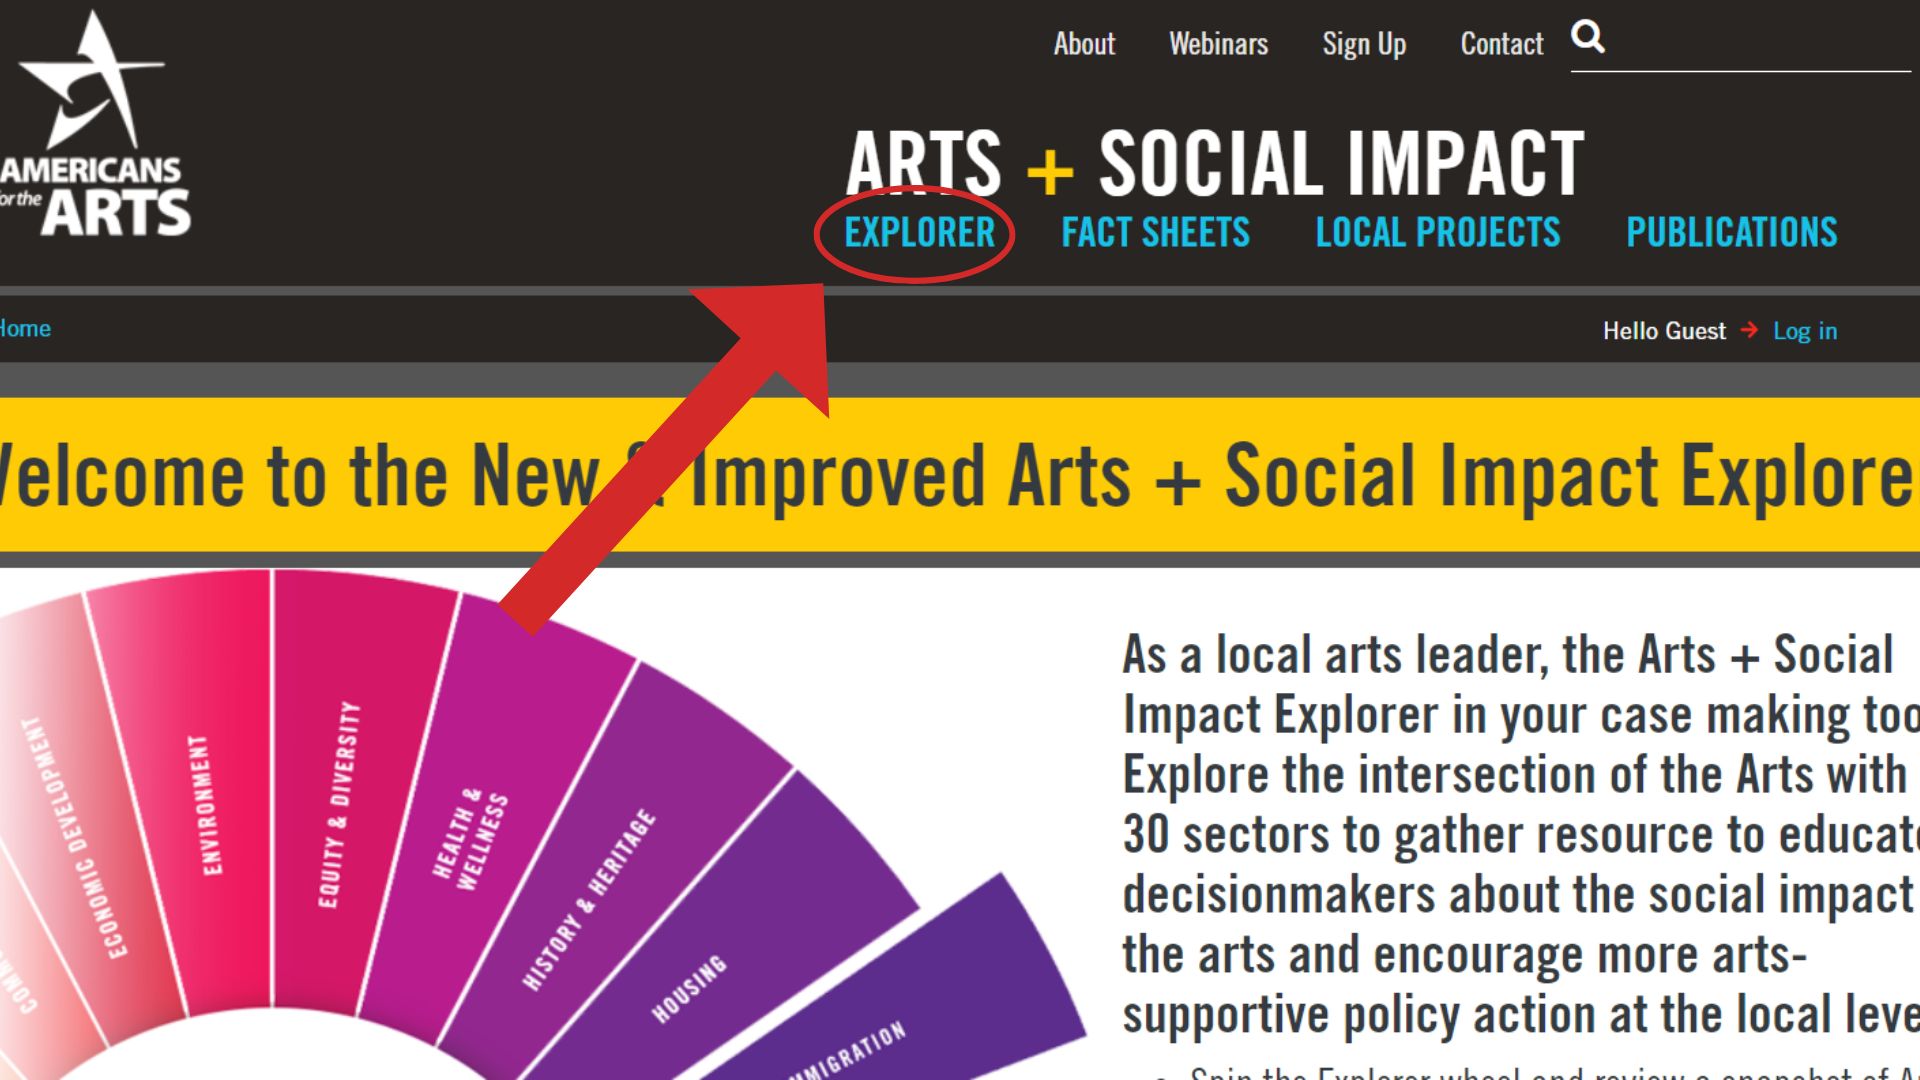
- First, navigate to the Explorer in the website menu.
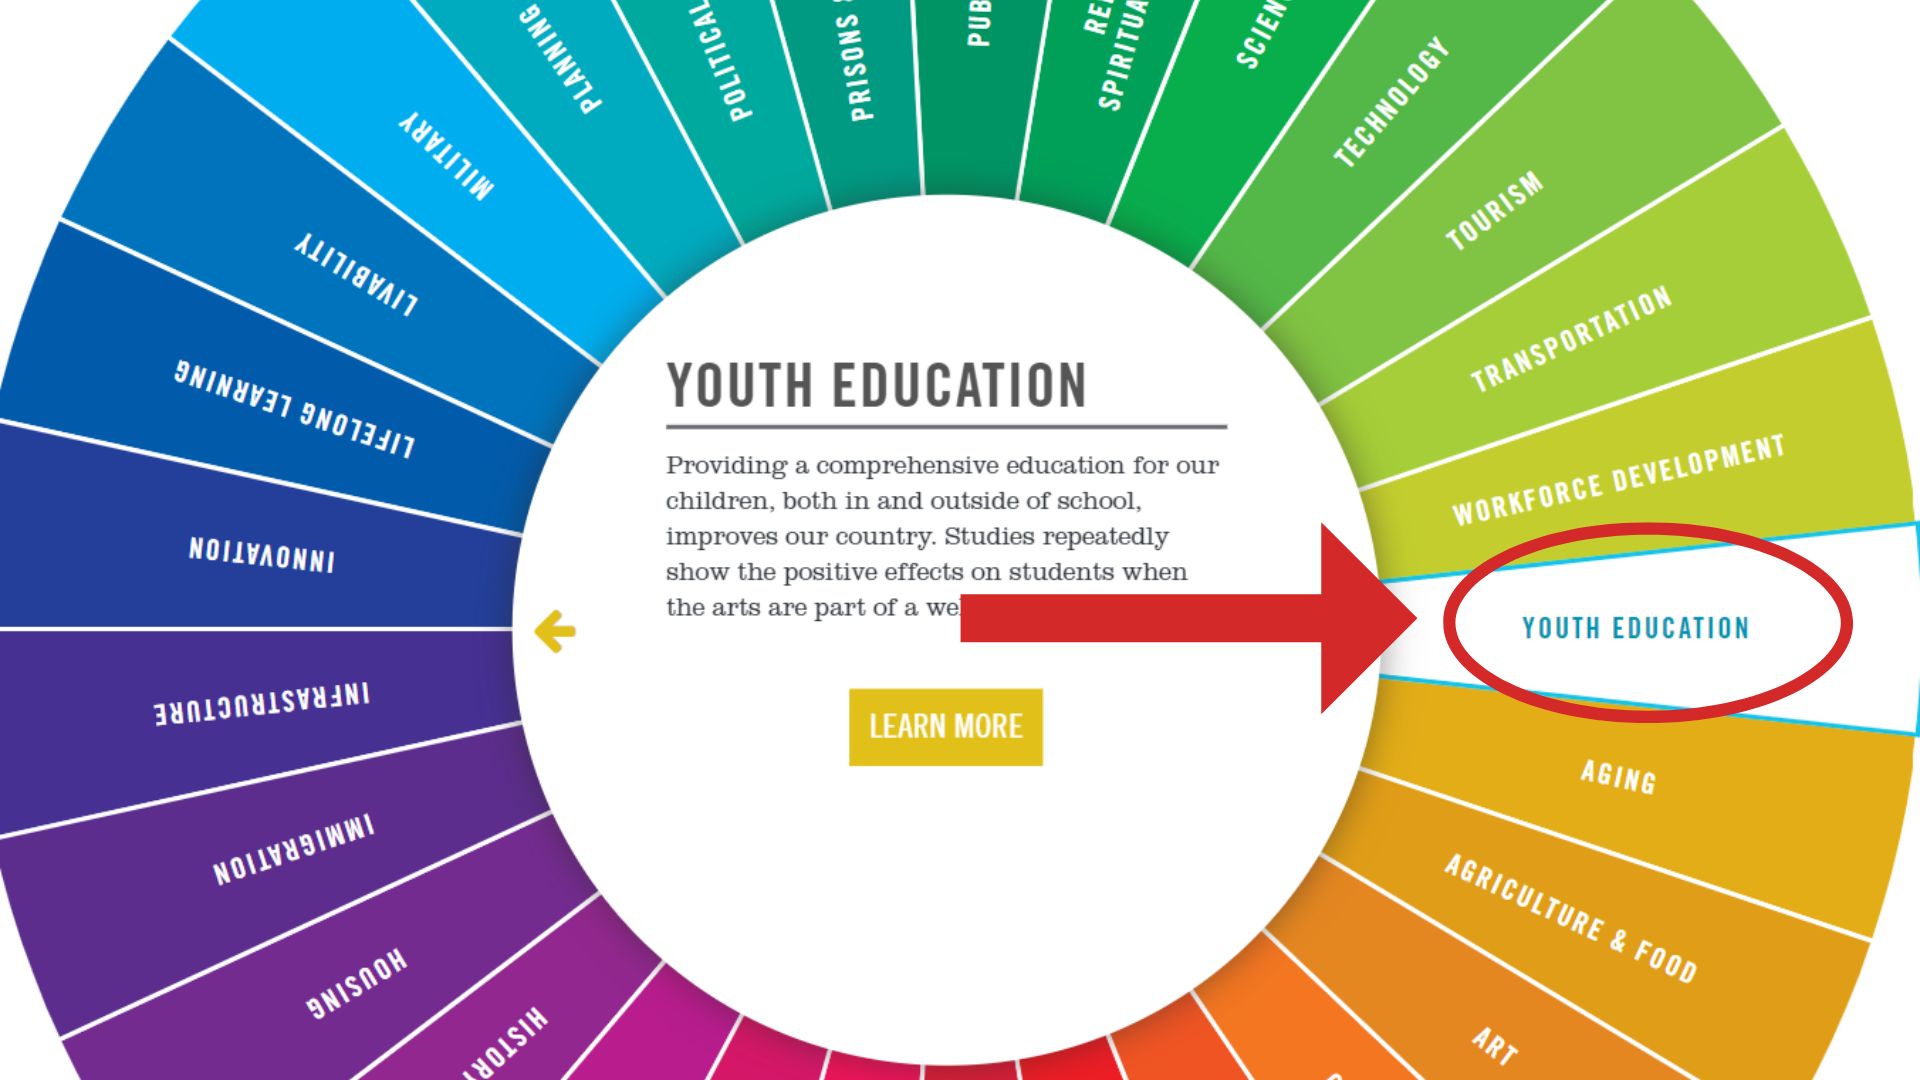
- The Arts Impact Explorer wheel has many different arts intersections to choose from. To begin viewing impact points, project examples, publications, and more, select an intersection's slice on the wheel.
- The wheel will spin and highlight the intersection you have chosen. In the middle of the wheel, your selected intersection with a brief description will appear, and you can then use the left and right arrows to scroll through slides of resource categories available for that intersection.
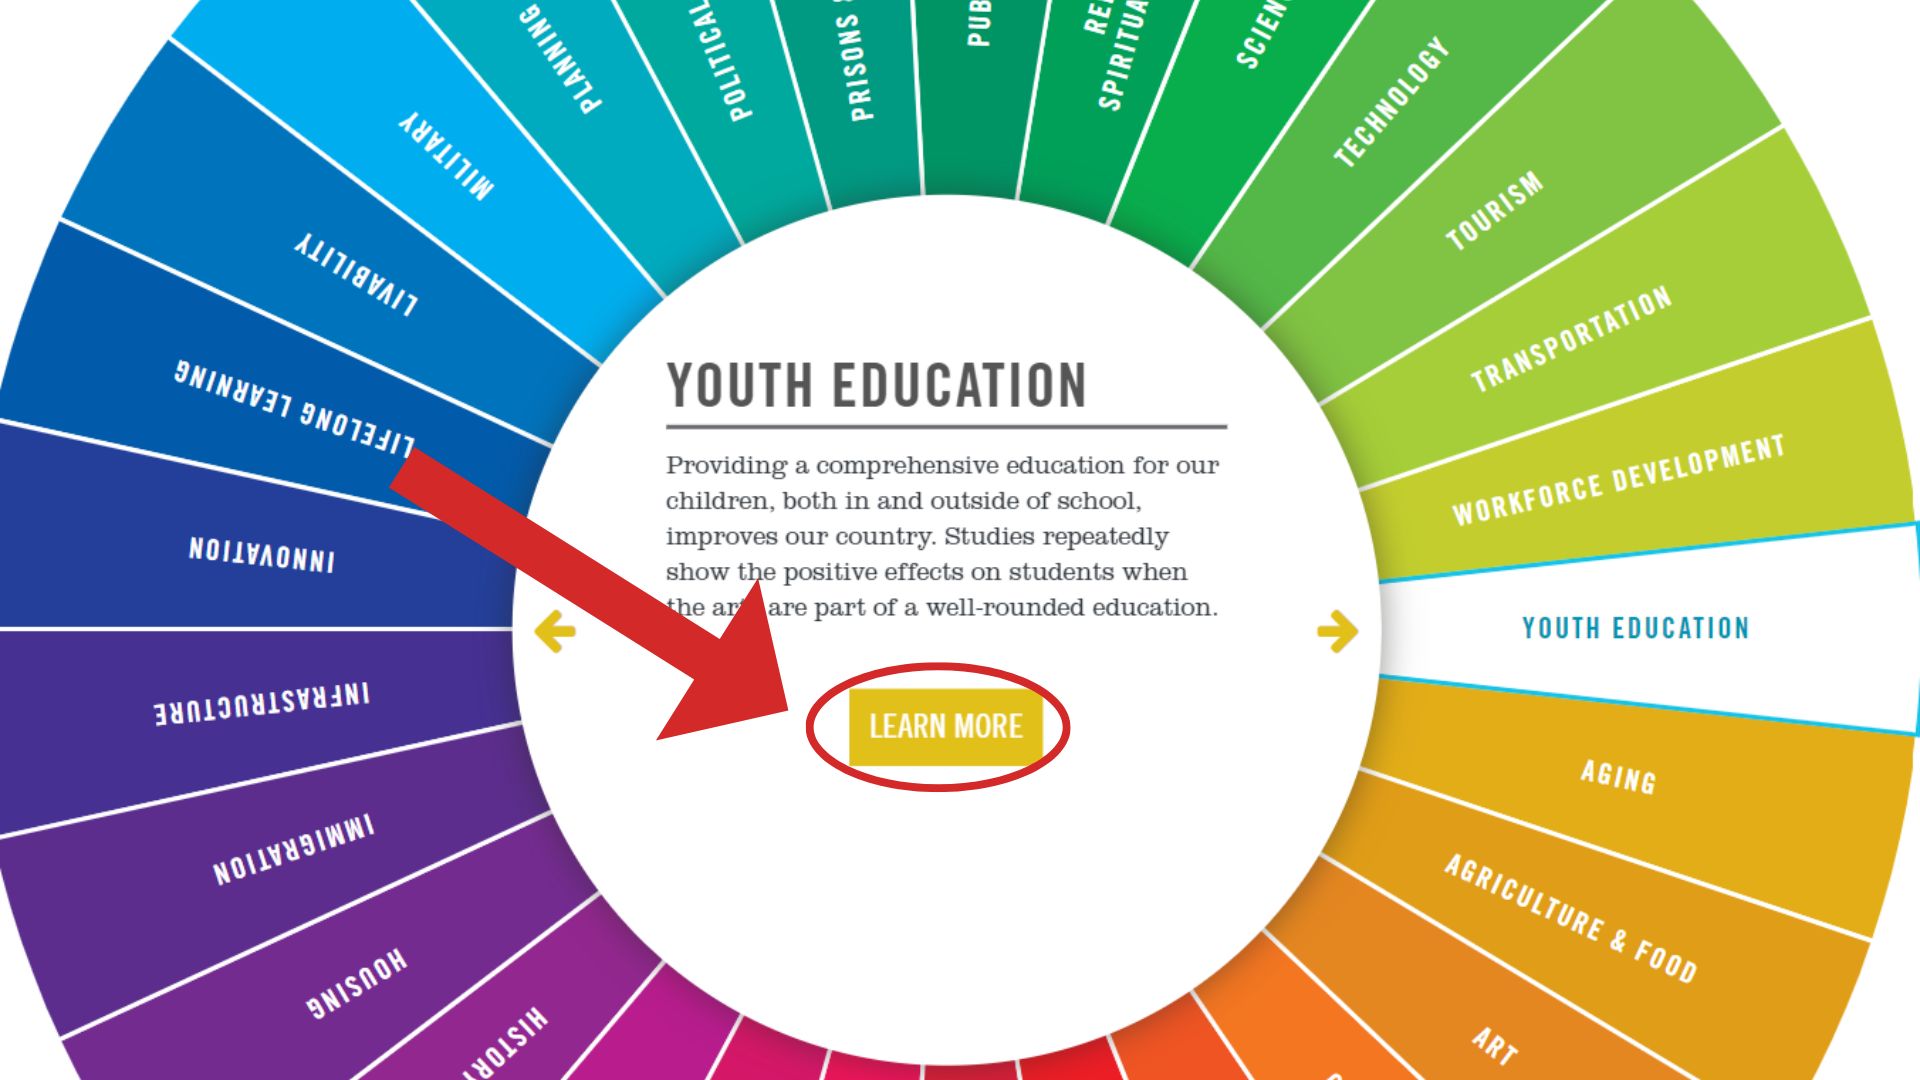
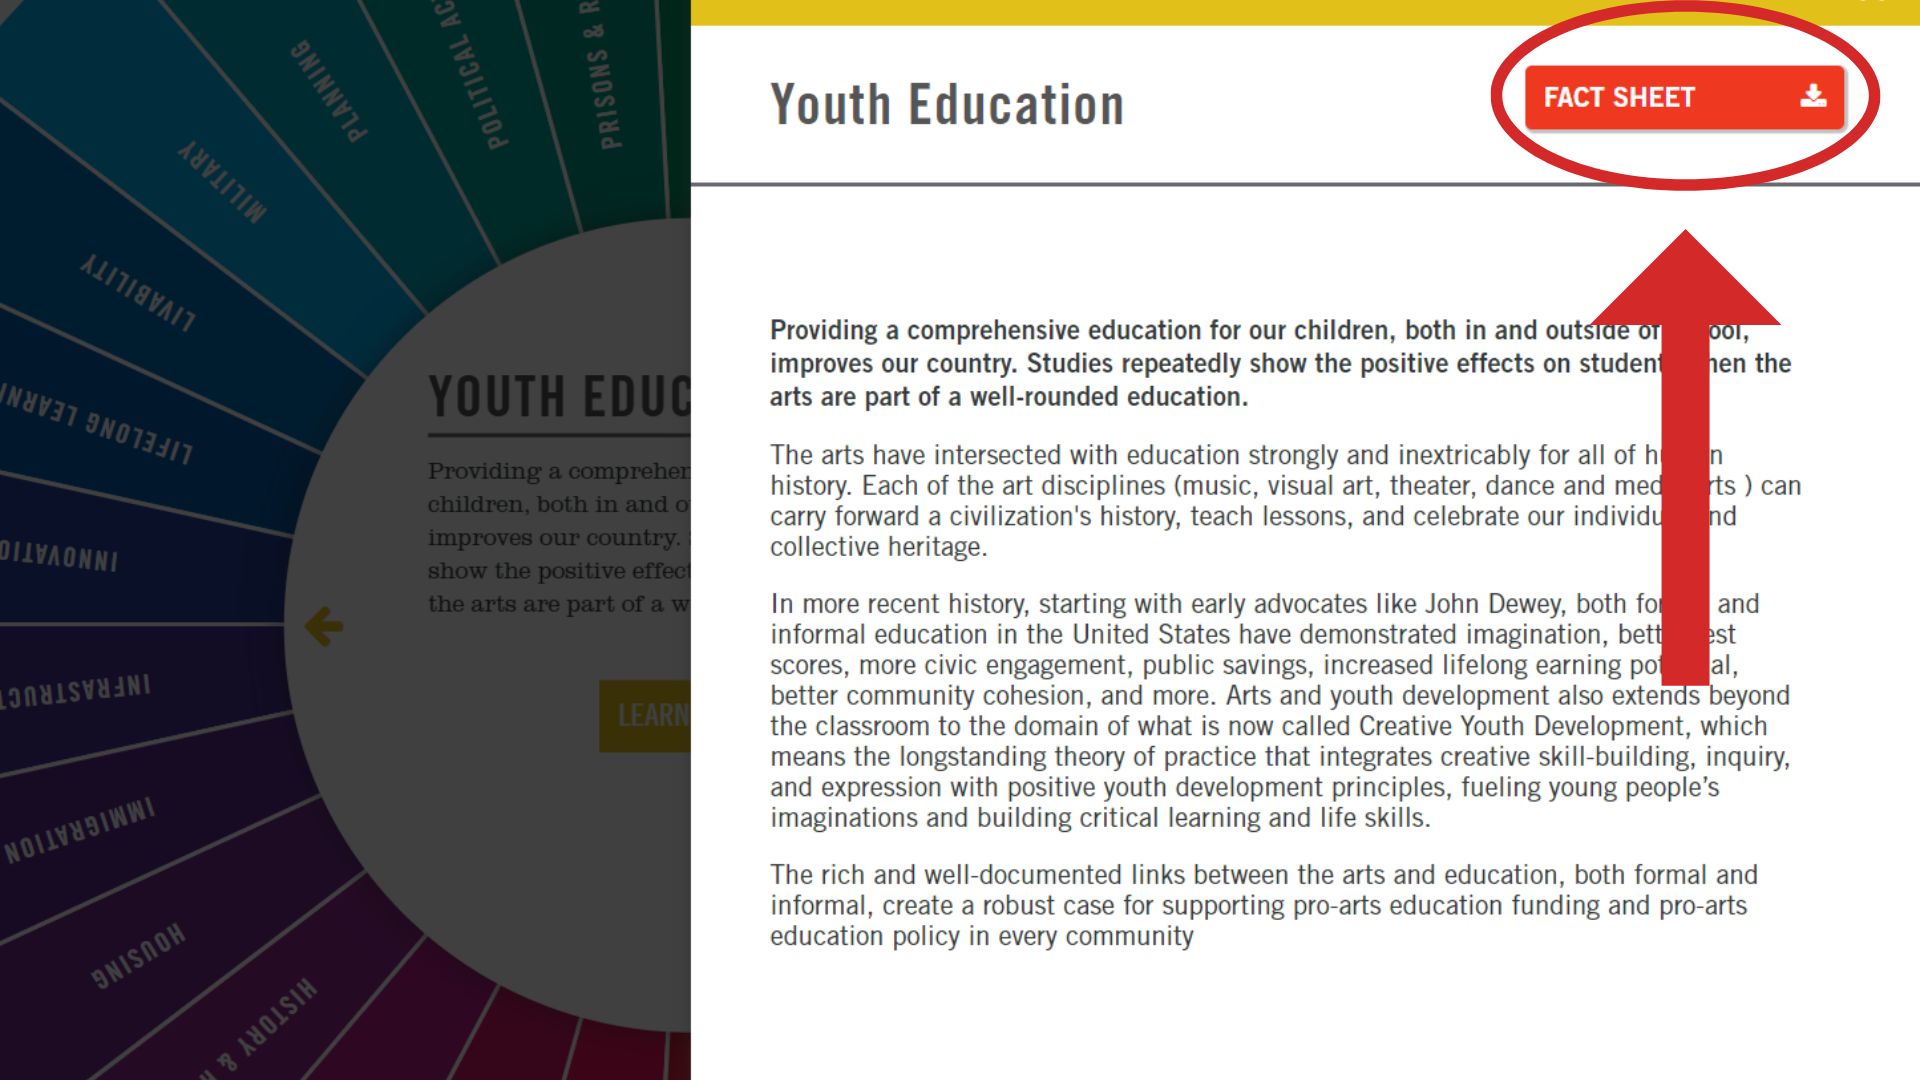
- To learn more about a certain slide, you can click on the "Learn More" button at any time. A side bar with information will then slide out to appear on the right-hand side of your browser.
- At any time when viewing the expanded side bar information for a given intersection, you can click the "Fact Sheet" download button in the upper right-hand side of the window to download a pre-designed Fact Sheet with that intersection's information contained within it.
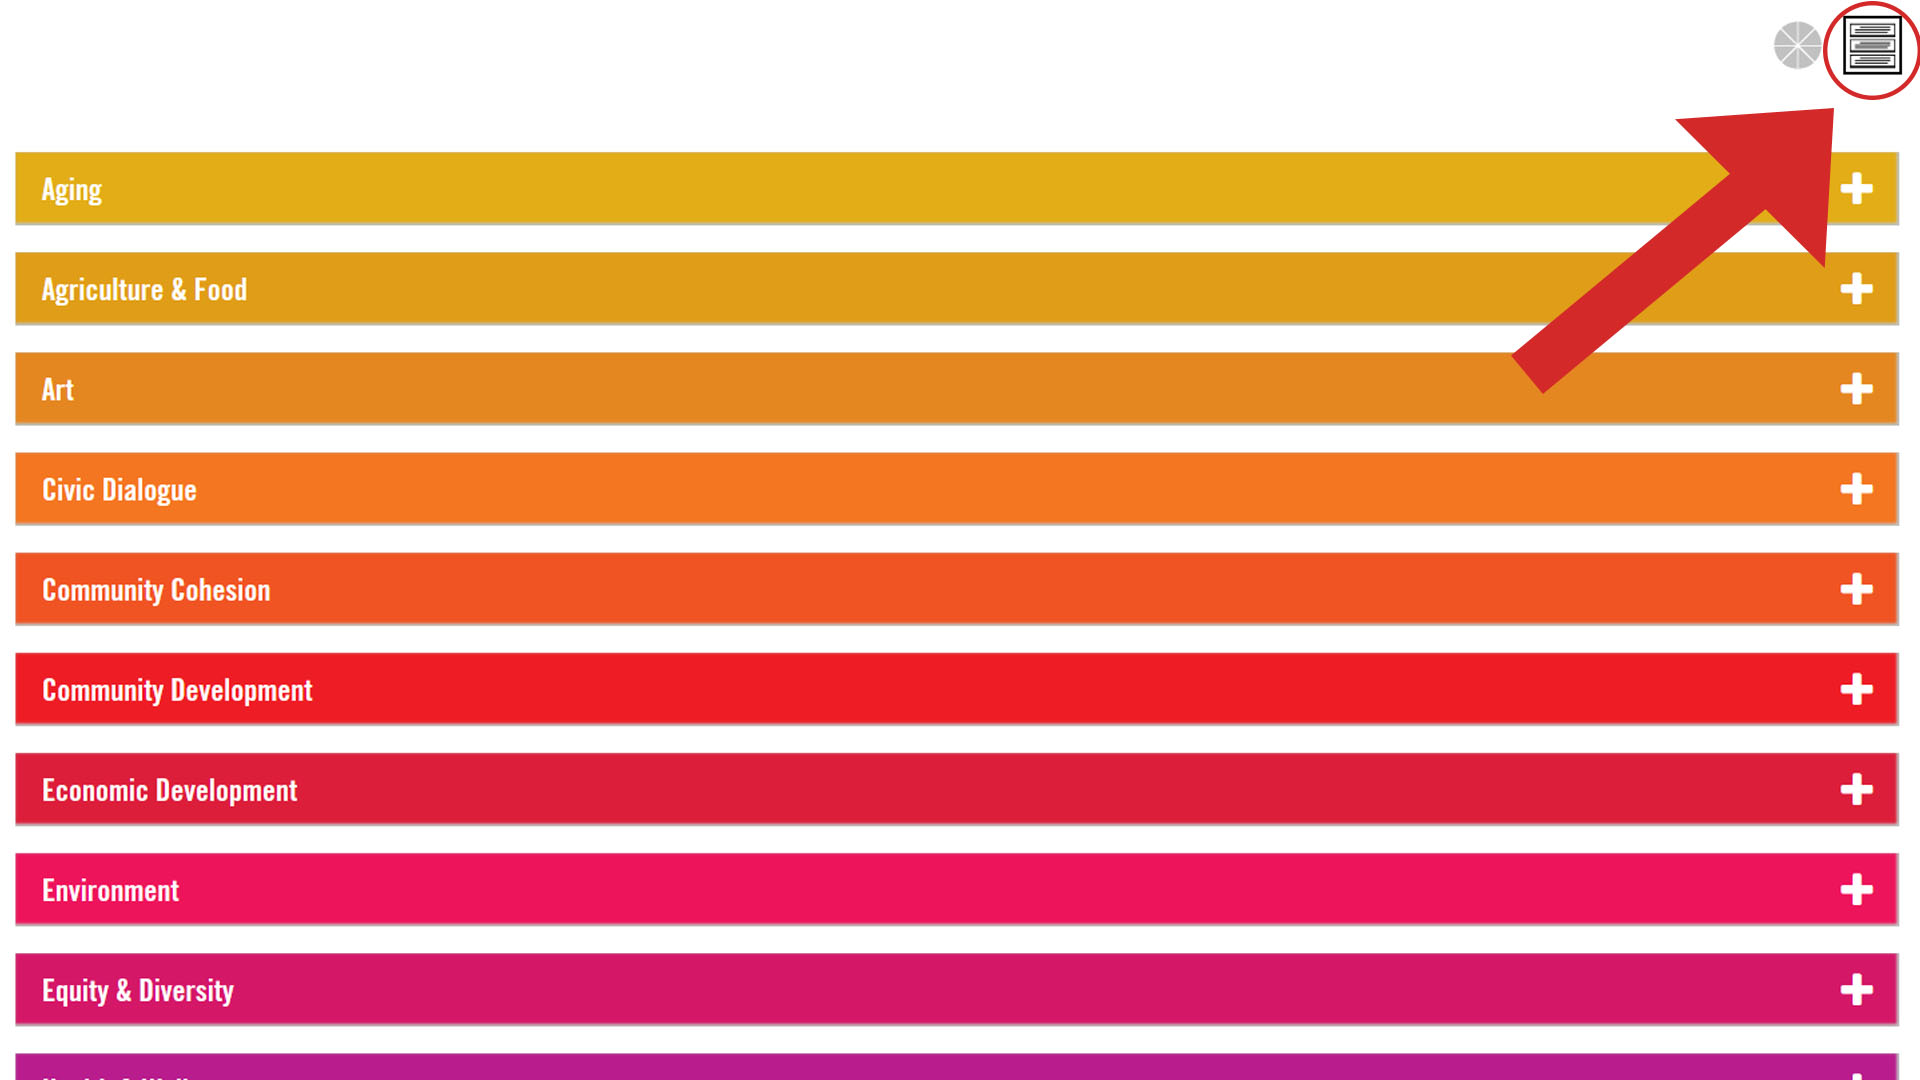
- Looking for an alternative way to navigate the Arts Impact Explorer? You can switch from the wheel view to a list view of all the arts intersections, where you can expand and view all the intersections' resources in one place.
[Return to the Top of the Page]
How to Build A Fact Sheet
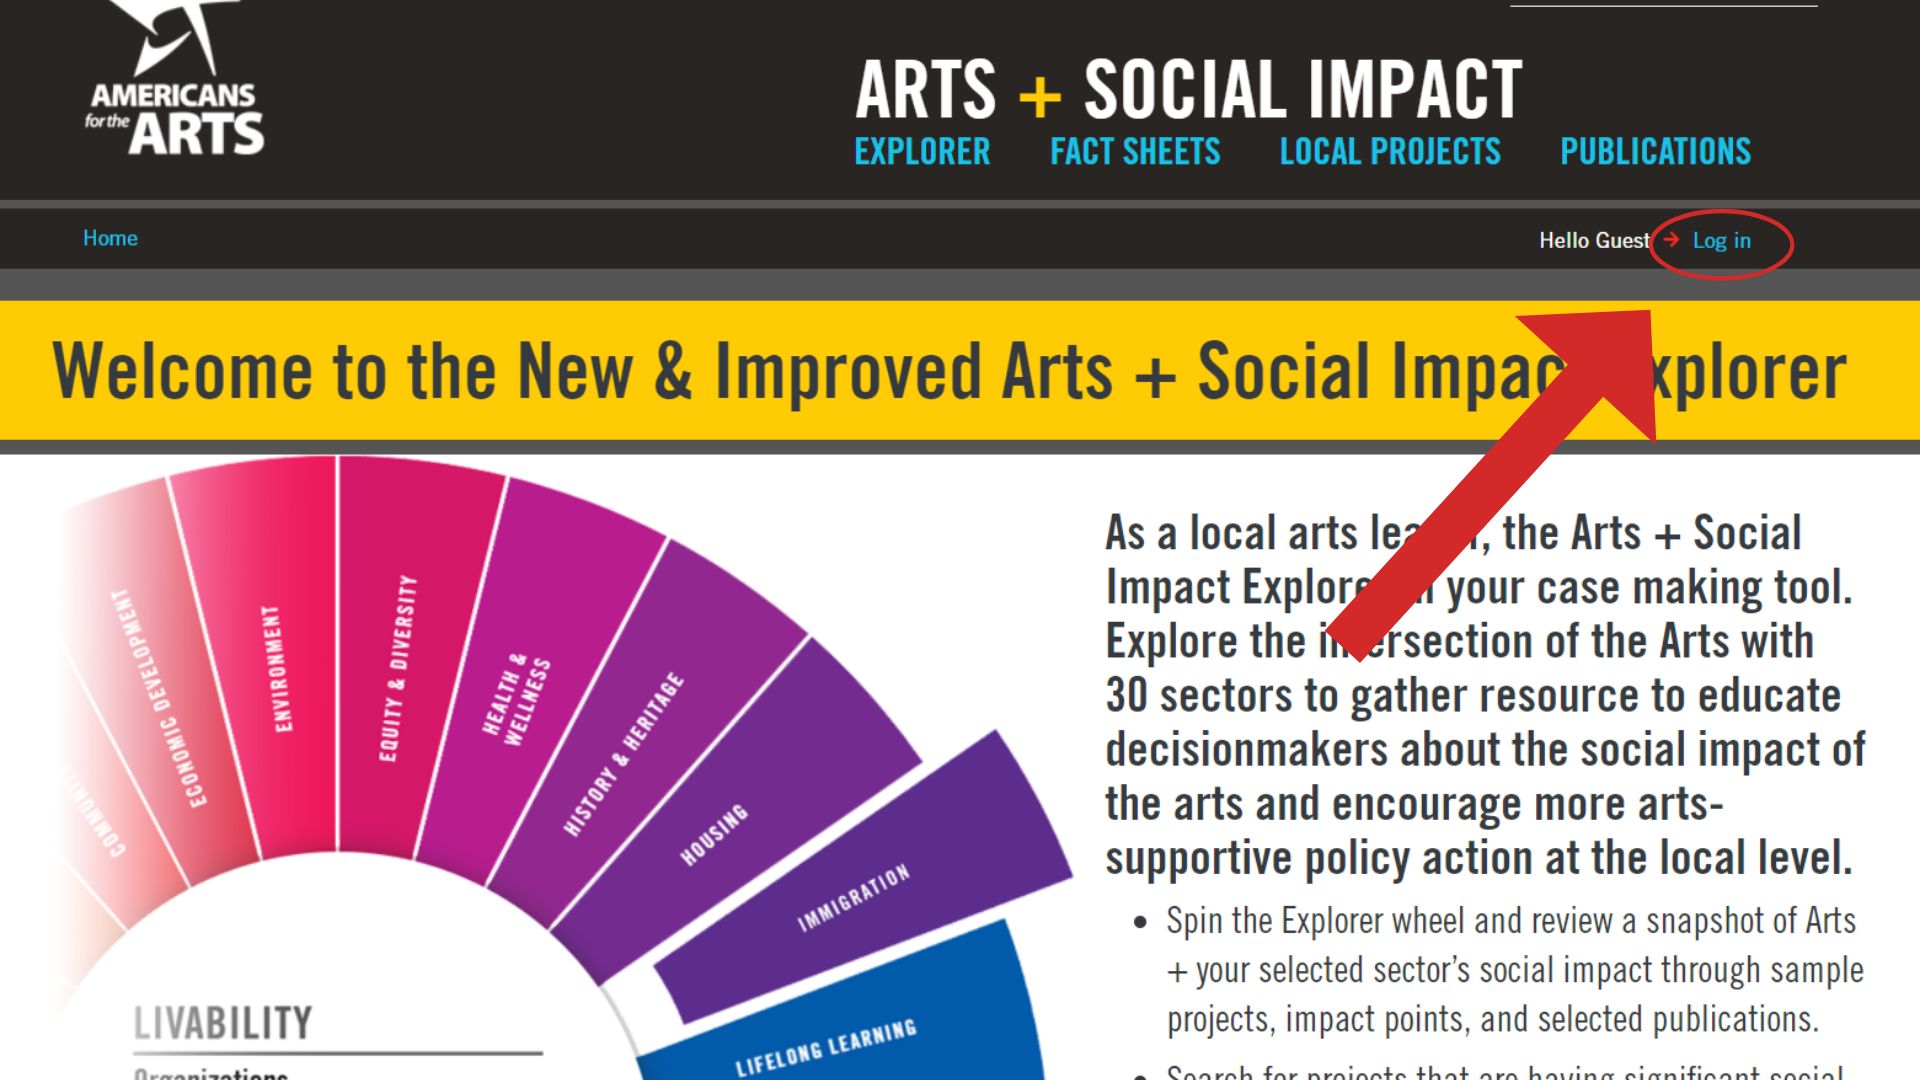
- To create a fact sheet, first you will need to log in to your Americans for the Arts website account. You can also create a new website account or verify if you have one, if needed.
- Navigate to the Build A Fact Sheet tool in the website menu. There are 6 steps to complete to create your own customized fact sheet, though every step is optional, depending on what you would like to include in your fact sheet.
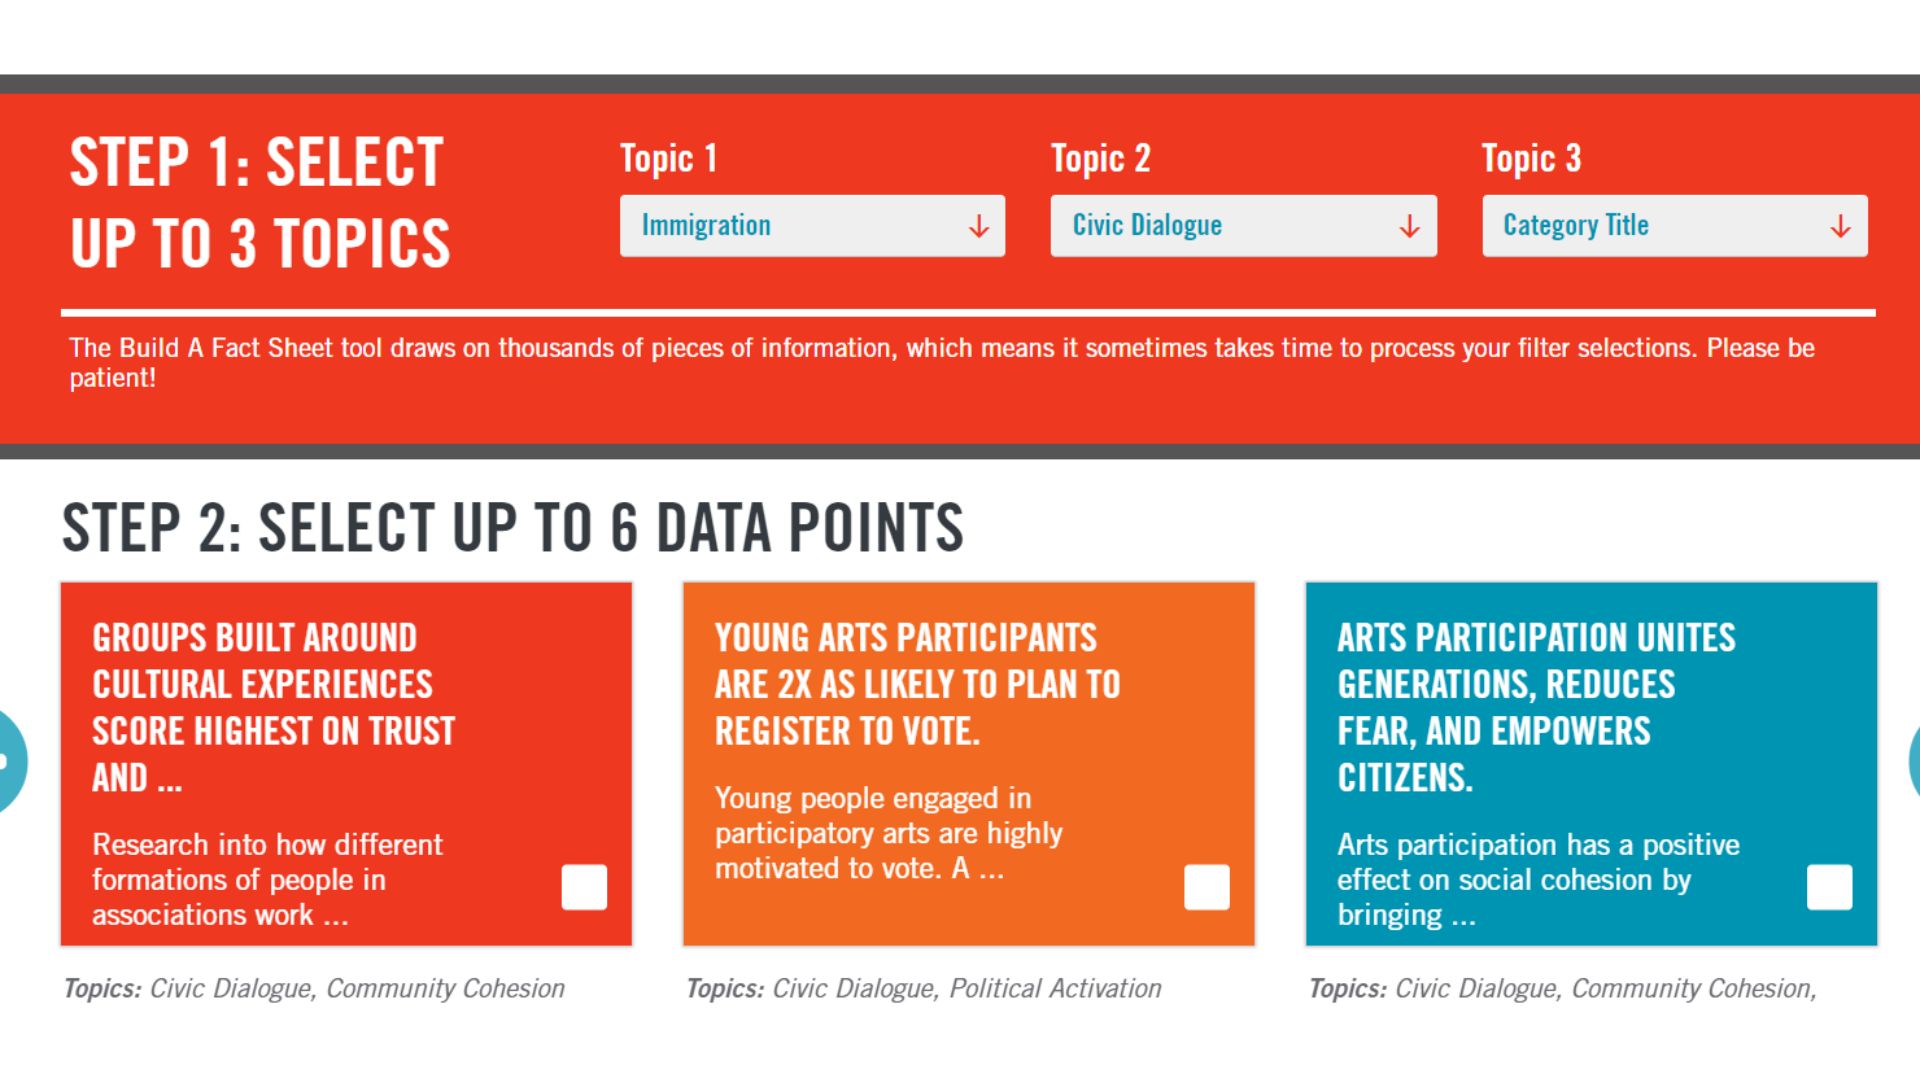
- Step 1: Select up to three arts intersections you would like to focus your fact sheet upon. This will filter the remaining steps to only show data relevant to those intersections; it may also take a moment for the filter to process.
- Step 2: Select up to 6 data points to include in your fact sheet. You can click the data point heading to view the full details.
- Step 3: Select up to 6 projects to feature in your fact sheet. You can click the project to view its full details. You may also filter to show projects by state or favorited projects, though these filters may show projects outside of your selected arts intersection(s). If you would like to add a project for use in a custom fact sheet, please view the "How to Add a Project to the Local Projects Database" instructions.
- Step 4: Select up to 3 publications to feature in your fact sheet. You can click the publication to view its full details. You may also filter to show favorited publications, though these filters may show publications outside of your selected arts intersection(s). If you would like to add a publication for use in a custom fact sheet, please view the "How to Add a Publication to the National Arts Publications Database" instructions.
- Step 5: Select up to 3 organizations to feature in your fact sheet. You may also enter keywords to search through the organizations list or filter organizations by state.
- Step 6: You may further customize your fact sheet by giving it a title and a description, and you may upload your organization’s logo as well.
- When you’ve made your inputs, click ‘Submit & Save’ to be taken to your custom fact sheet. Fact sheets are available for 6 months after creation on the Arts Impact Explorer website. You have multiple options for sharing and using your new fact sheet:
- You can share it via various social media platforms using the links above the heading.
- You can share it via email using the link above the heading.
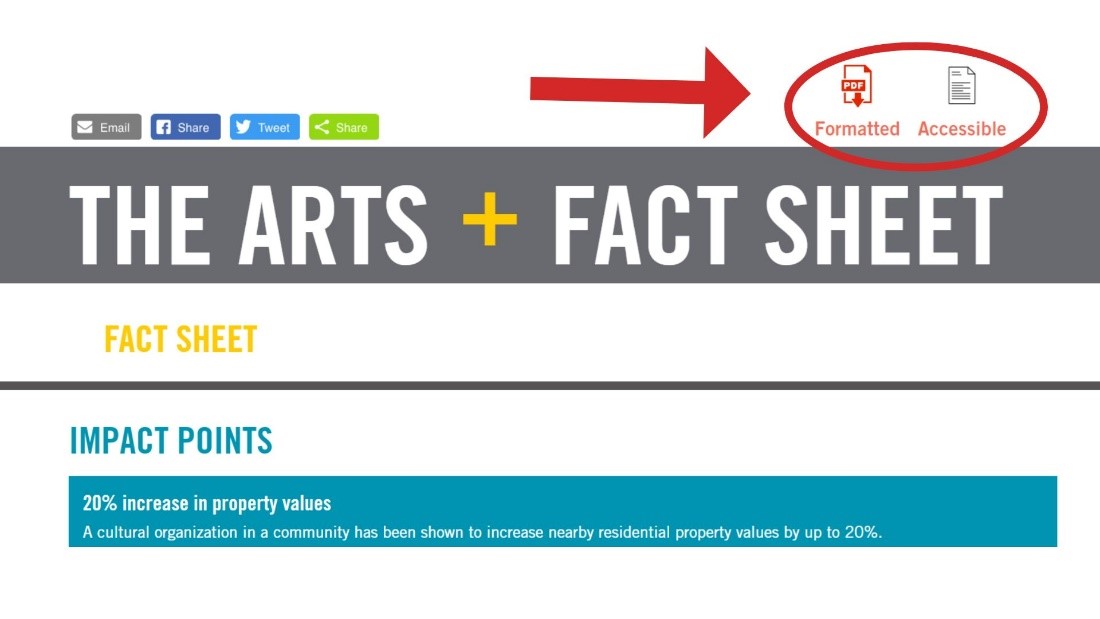
- You can download a PDF version of the fact sheet to share. A formatted and accessible PDF are both available.
[Return to the Top of the Page]
How to Add a Project to the Local Projects Database
- To add a project, first you will need to log in to your Americans for the Arts website account. You can also create a new website account or verify if you have one, if needed.
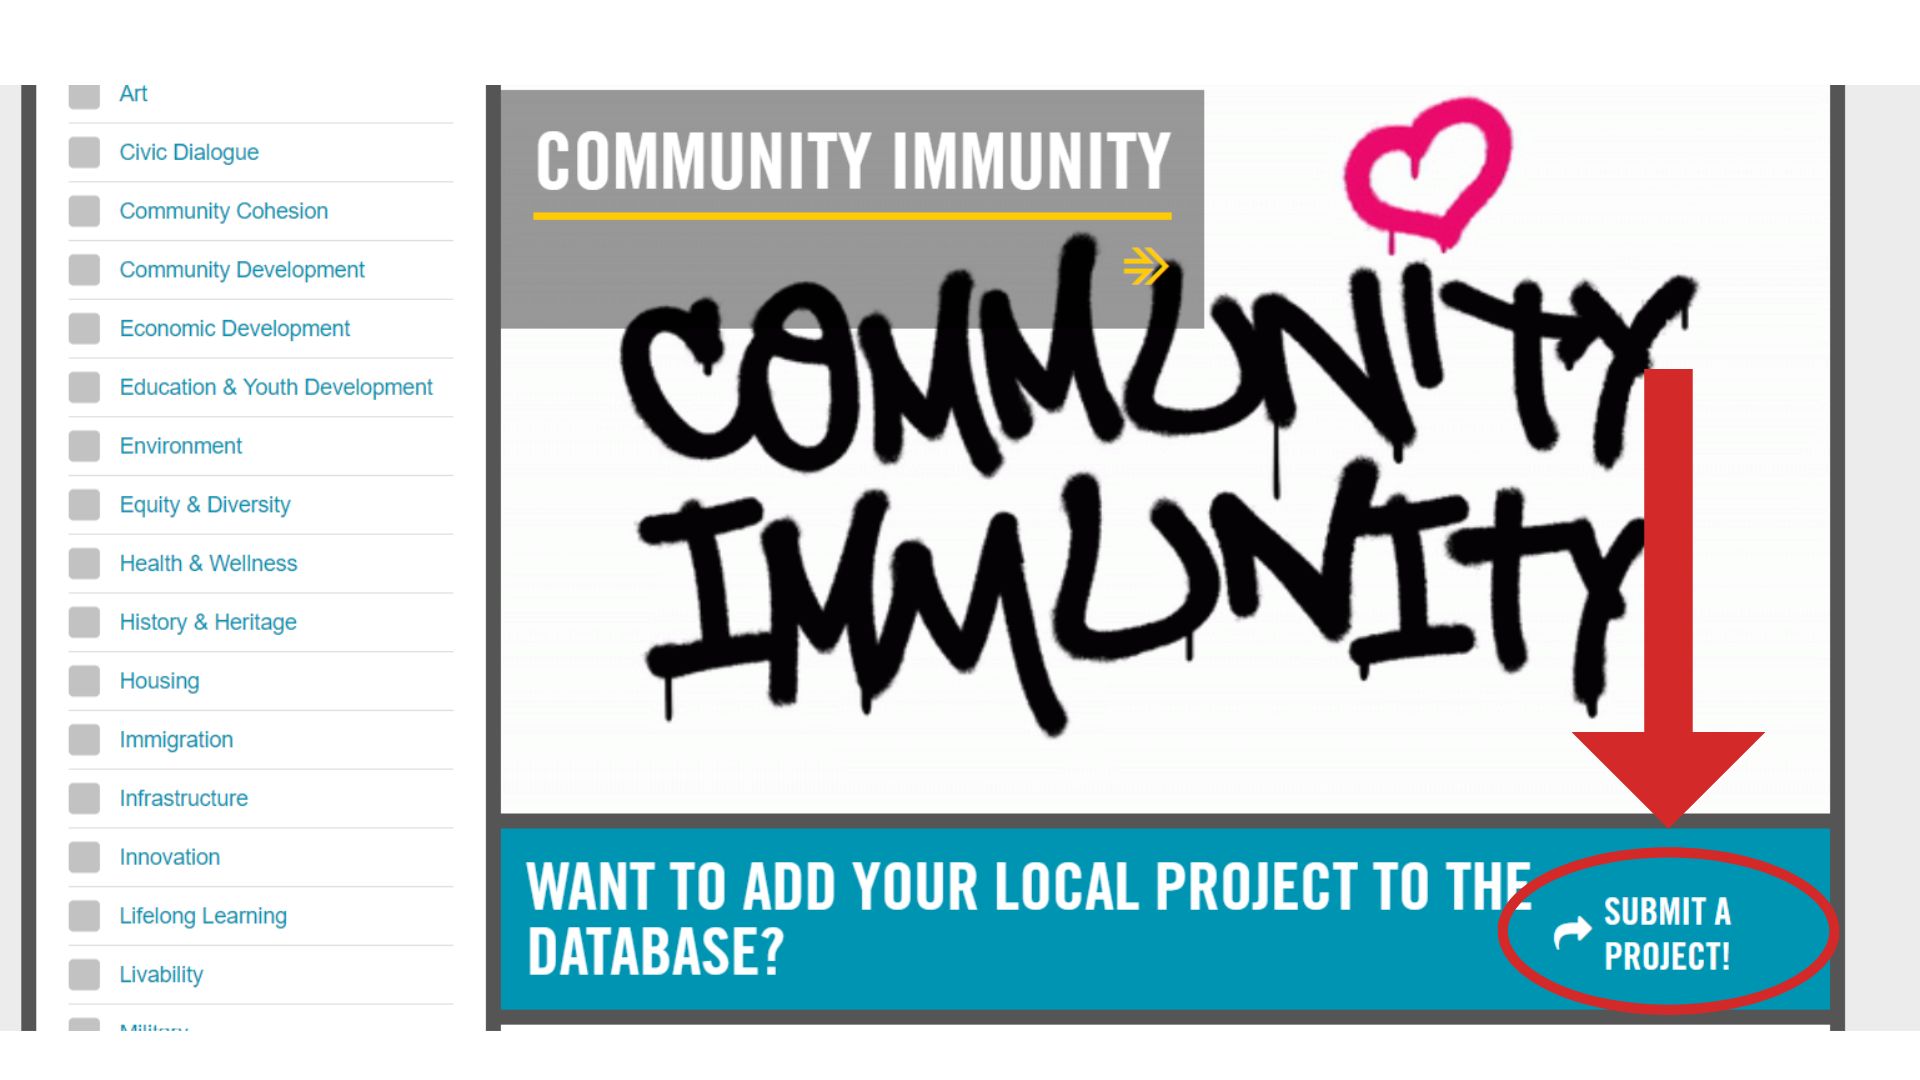
- Navigate to the Local Projects Database in the website menu. Underneath the top featured project labeled “Latest Project”, you should find a banner that reads “Want to add your local project to the database?” with a link that reads “Submit a Project” which will take you to the Project submission form.
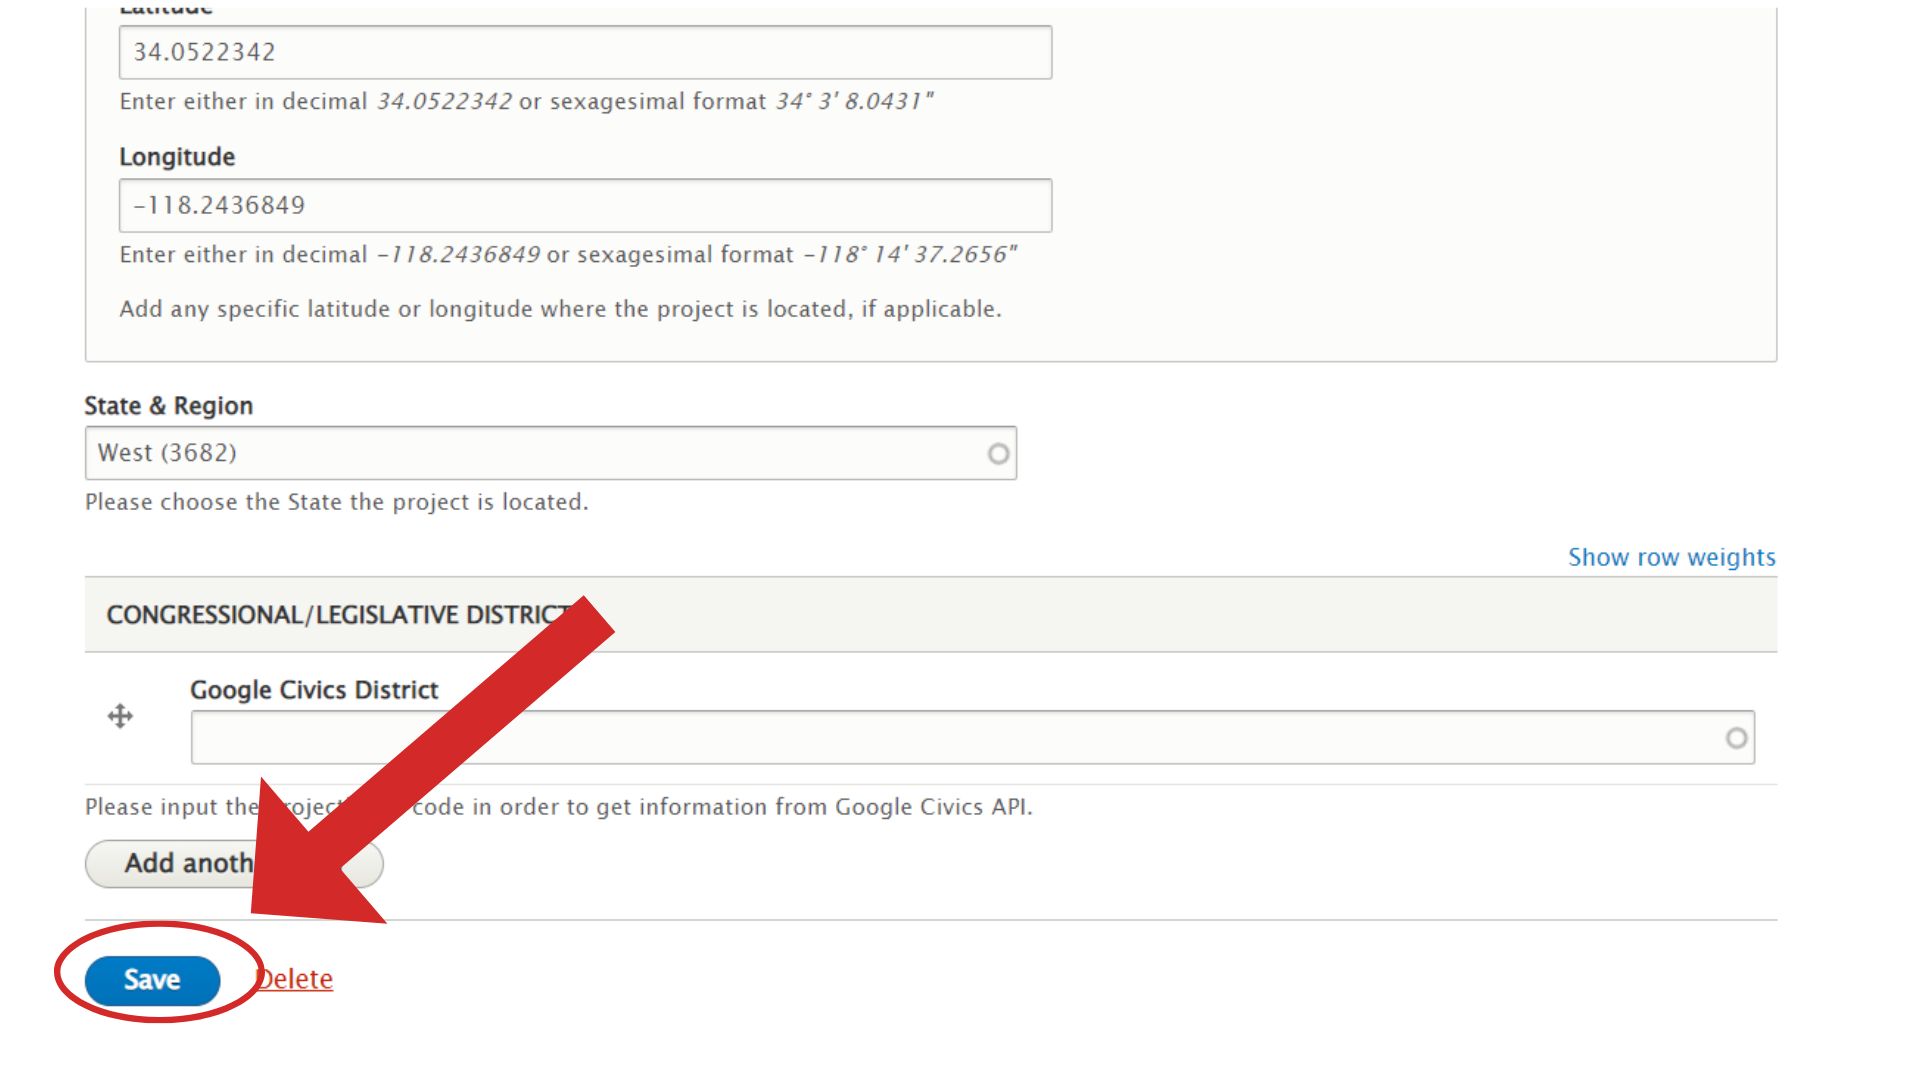
- Complete the form to the best of your ability detailing the project you would like to submit. Note that required fields will be marked by a red asterisk (and you will also be alerted if you attempt to submit the form without filling them out), but not every field is required for submission. Additionally, most fields have associated help text that will provide additional, specific instructions.
- When you’ve filled out the form, click the ‘Save’ button at the bottom at the bottom. You will be brought to a preview of your submitted project. Your project has now been submitted to be reviewed by Americans for the Arts staff and should be live in the database within two to three business days, or we may follow up to request additional details if needed.
[Return to the Top of the Page]
How to Edit an Existing Project in the Local Projects Database
- To edit a project, first you will need to log in to your Americans for the Arts website account. You can also create a new website account or verify if you have one, if needed.
- Navigate to the Local Projects Database in the site menu and browse the database to find the project you would like to edit. You can utilize the filter menu to narrow down the projects shown, if needed. Click the project to view its full details.
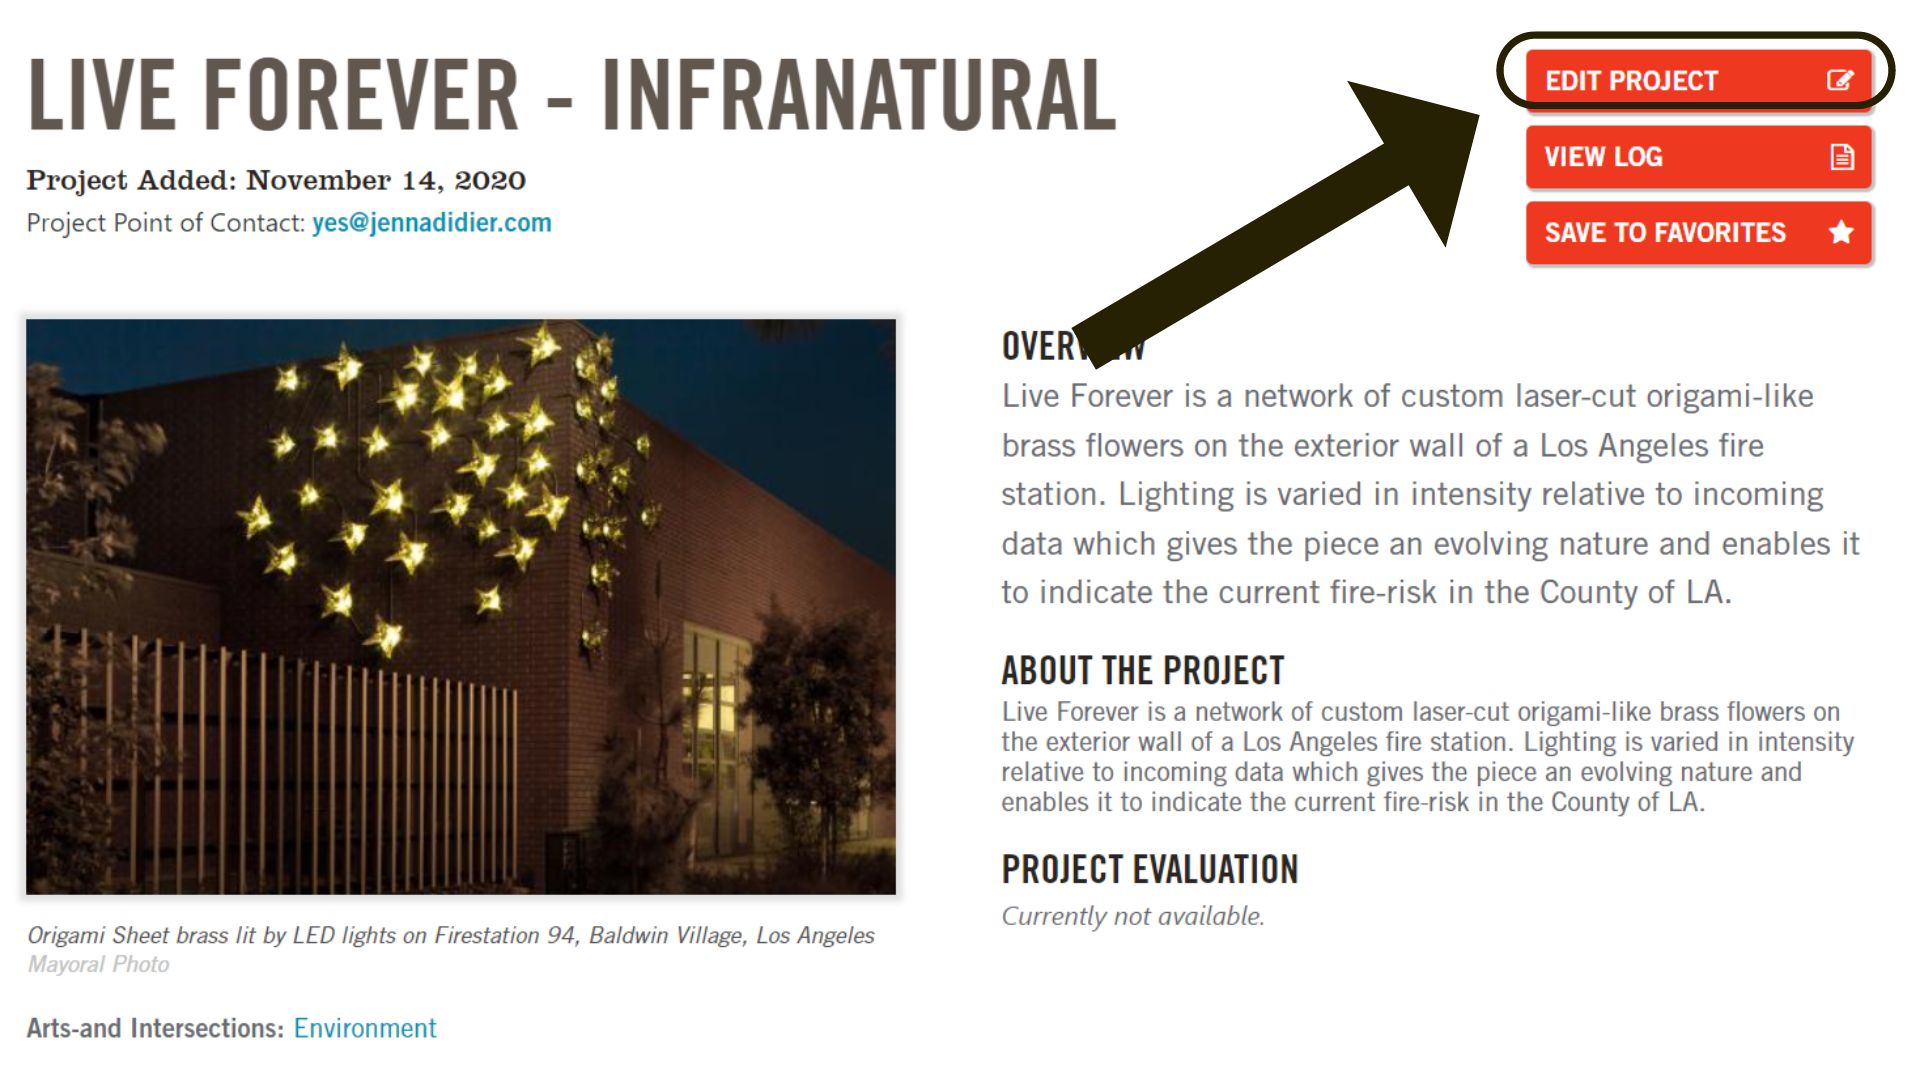
- On the project’s page, you should see a button that reads “Edit Project”. Click that button to be brought to the project’s form where you can make any desired changes to the project.
- Make changes as desired, and click the ‘Save’ button at the bottom at the bottom. You will be brought to a preview of your submitted updates. Your edits have now been submitted to be reviewed by Americans for the Arts staff and should be live in the database within two to three business days, or we may follow up to request additional details if needed.
[Return to the Top of the Page]
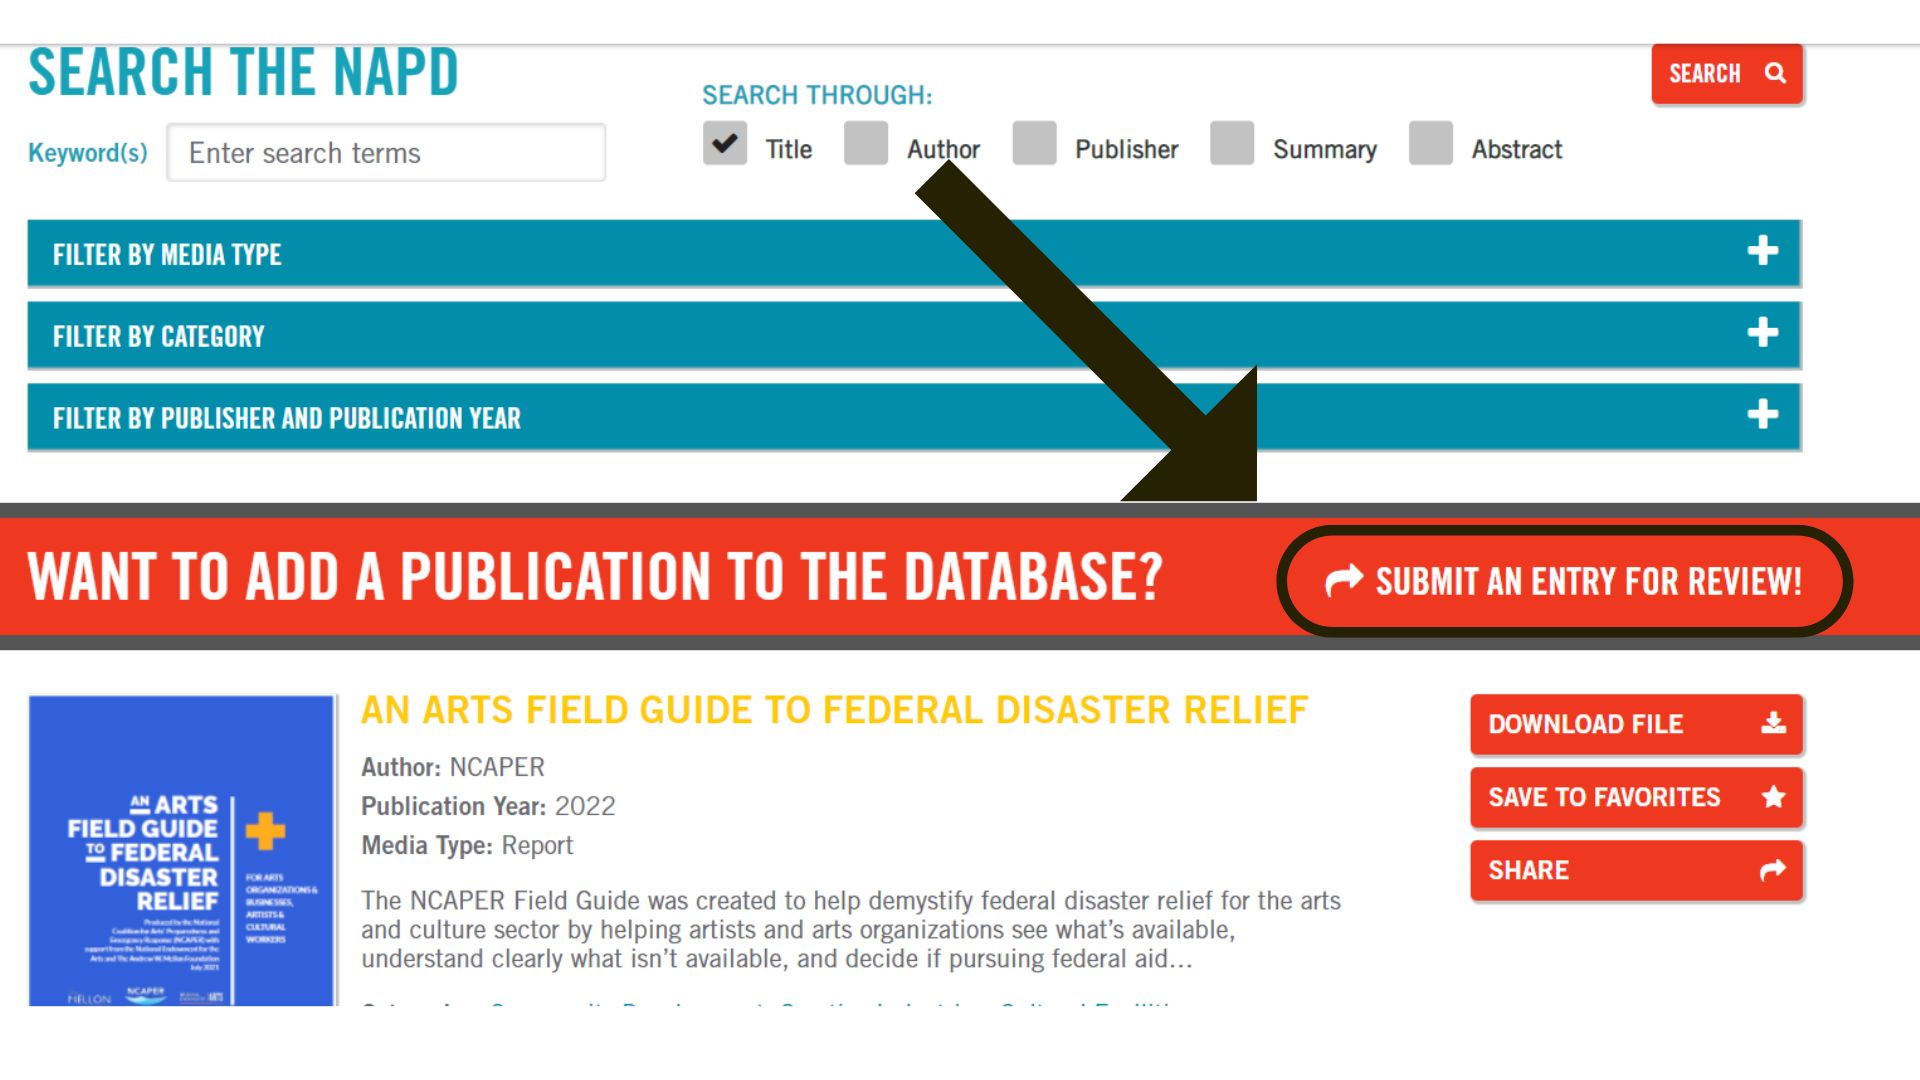
How to Add a Publication to the National Arts Publications Database
- To add a publication, first you will need to log in to your Americans for the Arts website account. You can also create a new website account or verify if you have one, if needed.
- Navigate to the National Arts Publications Database in the website menu. Underneath the top search and filters widget, you should find a banner that reads “Want to add a publication to the database?” with a link that reads “Submit an Entry for Review” which will take you to the Publication submission form.
- Complete the form to the best of your ability detailing the publication you would like to submit. Note that required fields will be marked by a red asterisk (and you will also be alerted if you attempt to submit the form without filling them out), but not every field is required for submission. Additionally, most fields have associated help text that will provide additional, specific instructions.
- When you’ve filled out the form, click the ‘Save’ button at the bottom at the bottom. You will be brought to a preview of your submitted publication. Your publication entry has now been submitted to be reviewed by Americans for the Arts staff and should be live in the database within two to three business days, or we may follow up to request additional details if needed.